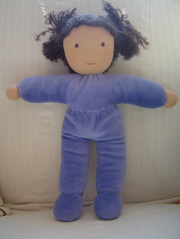
Basic instructions for a waldorf doll
" ......a handcrafted doll is one of a kind, an individual which carries the spirit of the maker in its stitches and absorbs the spirit of the child who loves it".
Isn't this a beautiful description of a handmade doll? I've been making waldorf dolls for about six years now and I was very lucky to be shown how by a German lady who was based at the waldorf school in Kings Langley. I started off making dolls for my own children and I in turn have taught other people to make dolls for their childen. In this way the waldorf doll making tradition continues as it has done for most of the last century. I have no idea why these dolls, which I believe were originally made by Kathe Krusse in Germany were adopted by the Steiner movement. I do know though that the dolls are made wherever there is a waldorf school and each country seems to have a slightly different way of forming the head, or tying the eye line or using different fabric for the skin. I make a few dolls each year to sell at our school's Christmas fair and as I was making a doll the other day I thought it would be interesting to document the process. So for those of you struggling with a book here are some basic instructions:
The dolls I make are 16'' tall and made from natural materials. First off I wind a ball from washed fleece to form the head. The ball on the left of the photo has a 12'' circumference and is probably a bit large to be honest. Then I take two pieces of carded fleece and place them in a cross and I put the head on top and I encase the ball and put it into a piece of tubigauze which I have stitched along the top. I push the head into the tube and tie it at the neck. There will be fleece sticking out but that's OK because it forms the shoulders/chest.
Next off you need to tie the eye, head and chin lines. I take a long needle and linen thread and I go into the side of the head at the ear (halfway down the head) and I go through the head to the other ear. Bring the thread back across the face and tie very tightly to the thread hanging out at the first ear. Then take the needle over the head and back through second ear to the first ear and pull tight, then take the thread under the chin and through the second ear to first, pull tight and finely round the back of the head and same process back to the first ear. Phew - your fingers will be aching by now but tie the two threads together and cut off the tail. Then take a piece of skin coloured stockinette and stretch it and pin it across this head and sew up the back and top and again tie at the neck.
Place pins where you think the eyes and mouth should be and embroider them.
Then sew up the arms and body on the sewing machine ( I can give you a pattern if you don't have one - just e-mail me). Turn right side out and stuff the hands and arms with fleece, firmly.
Sew the arms onto the back of the chest piece. I forgot to say to leave a few inches free at the top of the arms.
Stuff the feet and then the legs and then the tummy of the doll. Place the head and arms into the body and sew around the arms pushing in more fleece from the other side to firm up the chest. Finally sew around the neck and sew the head to the body with ladder stitch. You will need to bind off the hands and feet now but I forgot to take a picture of that.
Now the time consuming process of doing the hair. For boys I crochet a cap and then hook individual strands into the cap. For girls I either make a hair piece by winding wool around a book or I weave the hair over pins placed on the middle of the head and the ear which I then sew down. I would seriously recommend that you get a book for the pattern and for hair making instructions. A very good one is 'Kinder Dolls' by Maricristin Sealey. For doll supplies like the tubigauze, stockinette and hair you could try Weir Dolls, Waldorf Toys or Myriad.
Here are a few more pics of some of my dolls. Once you can make the head there are endless ways of making dolls with them. You can make a doll with a felted body or use and old cardigan.
You can even make little dolls for the seasonal table:
Well, I think that's enough navel gazing for one evening. Do let me know if it doesn't make sense or if you'd like the pattern and good luck - it isn't that difficult honestly and your child will cherish it forever.
.......................................
A couple of links to some beautiful waldorf dolls on flickr here, here, and here.


.jpg)


3 comentários:
lindas bonecas parabenssss
Que lindinhas as bonecas! Vou mostrar pra minha mãe, quem sabe ela se anima??
Bj
Parabéns pelo blog!!
Oi, amiga. Passei pra conhecer seu cantinho e adorei as imagens de crianças que você publicou. Estou precisando de uma imagem de duas menininhas moreninhas de cabelos caracolados, pra fazer um layout. Será que você poderia me ajudar?
Bjks e passa pra me visitar, viu.
Amanda
http://amandalayouts.blogspot.com
http://pingosegotas.blogspot.com
Enviar um comentário